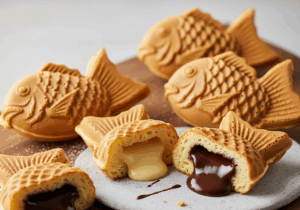
In the heart of Japan’s bustling streets, a delightful aroma dances through the air-sweet, warm, and inviting.Taiyaki, the iconic fish-shaped pastry, is more than just a treat; it’s a beloved tradition that has captured the hearts and taste buds of locals and visitors alike. But what makes this crispy, golden delight so special? Behind its playful shape lies a rich history and a delicate craft that transforms simple ingredients into a mouthwatering masterpiece. Join us as we dive into the art of crafting taiyaki, unraveling each step that turns batter and filling into Japan’s most charming fish pastry. Whether you’re a curious cook or a passionate foodie, this guide will take you on a flavorful journey from batter to bite.
Crafting Taiyaki begins with a delicate balance of batter preparation, an art passed down through generations in Japan. This beloved fish-shaped pastry charms with its crisp, golden exterior and warm, luscious filling inside.Originating as a street food favorite, Taiyaki invites you to explore not just a recipe but a tactile experience of batter pouring, filling layering, and mold mastering that lets you savor conventional Japanese culture in every bite. Whether you’re dipping into classic sweet red bean or venturing into inventive, savory fillings, this guide empowers you to create flawless Taiyaki at home.
Prep and Cook Time
- Preparation: 20 minutes
- Cooking: 15 minutes
- Total Time: 35 minutes
Yield
Makes 6 medium-sized Taiyaki
Difficulty Level
Medium – requires attention to batter consistency and mold technique
Ingredients
- 1 cup all-purpose flour, sifted
- 1 tsp baking powder
- 2 tbsp granulated sugar
- 1/4 tsp salt
- 1 large egg
- 3/4 cup milk, room temperature
- 2 tbsp vegetable oil or melted butter
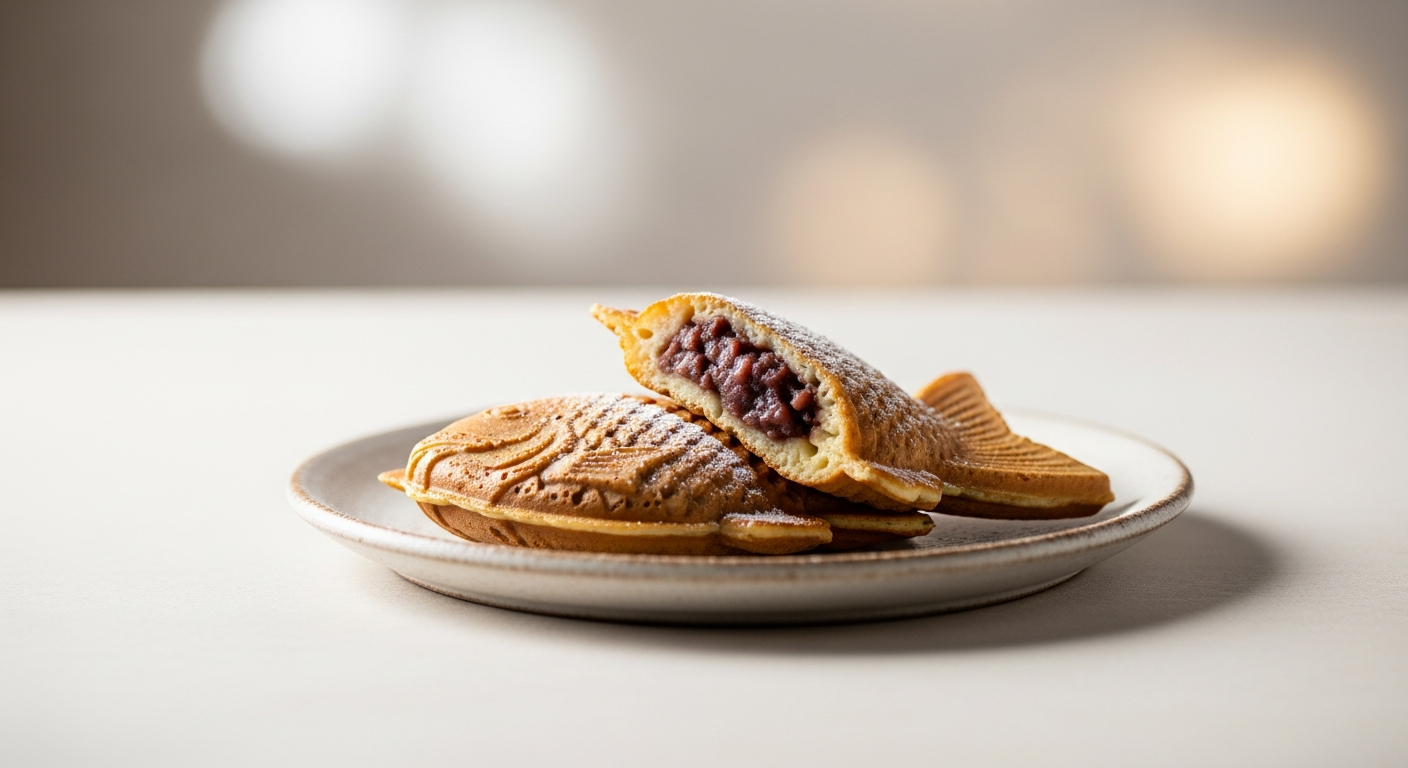
- 1/2 cup sweetened red bean paste (anko) or alternative fillings
Instructions
- Mix dry ingredients: In a large bowl, whisk together flour, baking powder, sugar, and salt until evenly combined.
- Combine wet ingredients: In a separate bowl, beat the egg lightly. Add milk and oil, whisking gently until smooth.
- Form batter: Gradually pour the wet mixture into the dry ingredients while stirring gently. Aim for a smooth, slightly thick batter free of lumps-think of pancake batter but a bit denser.
- Preheat the Taiyaki mold: Place the mold on medium heat, lightly brushing both sides with vegetable oil to prevent sticking.
- Pour batter into mold: Pour approximately half the batter evenly into one side of the mold, covering the fish shape but not filling it completely.
- Add filling: Spoon about 1 tbsp of your chosen filling (traditional anko, chocolate, custard, or even savory cheese and sausage) directly onto the batter center, ensuring room around the edges.
- Seal with more batter: Pour the remaining batter over the filling to cover it fully,allowing the batter to fill the entire mold shape edge to edge.
- Cook the Taiyaki: Close the mold and cook for 2-3 minutes on each side, flipping carefully every few minutes. The Taiyaki is ready when it’s crisp, golden brown, and releases easily from the mold.
- Cool slightly before serving: Let the pastry rest 2 minutes on a wire rack to retain crispness while fillings remain warm and gooey.
Chef’s Notes: Tips for Success
- Batter consistency is key – too thin, and the Taiyaki will be fragile; too thick, and it’ll be dense. Adjust with a splash of milk or flour accordingly.
- Oil your mold generously before each batch to secure the golden crust without sticking.
- Fillings: Classic anko paste delivers authentic sweetness, but matcha custard, Nutella, or savory mashed sweet potato with bonito flakes offer inventive twists.
- Experiment with serving warm or slightly chilled, depending on your chosen filling’s texture.
- Make-ahead tip: Prepare batter and fillings in advance; store batter refrigerated up to 24 hours, stirring gently before use.
Serving Suggestions
Present your Taiyaki on a rustic wooden board or Japanese-style bamboo plate for an authentic effect.Sprinkle with toasted sesame seeds or a light dusting of powdered sugar to elevate the visuals and flavor contrast.Pair with a cup of green tea or sweetened azuki soup to celebrate the full sensory experience. For an instagram-worthy touch,drizzle a bit of sweetened condensed milk or dark chocolate over the fish’s golden scales right before serving.
| Nutritional Info (per piece) | Calories | Protein | carbs | Fat |
|---|---|---|---|---|
| Classic red Bean Taiyaki | 210 | 4g | 40g | 5g |
| Chocolate-filled Taiyaki | 230 | 3g | 38g | 7g |
| Savory Cheese Taiyaki | 250 | 7g | 35g | 10g |

For further inspiration on Japanese-inspired street snacks, check out our detailed Japanese Street food Recipes collection. To deepen your understanding of traditional anko bean paste, visit the cultural insight page at Japanese Red Bean paste.
Q&A
Q&A: Crafting Taiyaki – Step-by-Step Guide to Japan’s Fish Pastry
Q1: What exactly is Taiyaki?
A: Imagine a warm, golden fish-shaped cake, crisp on the outside and fluffy inside, filled with sweet surprises like red bean paste, custard, or chocolate. That’s Taiyaki, Japan’s beloved street snack that’s as charming in shape as it is delightful in taste.
Q2: Where did Taiyaki originate?
A: Taiyaki first swam into Tokyo’s food scene back in the early 20th century. Inspired by imagawayaki (round filled cakes), the fish shape-a tai, or sea bream-was chosen for its symbolism of good luck and celebration in Japanese culture.
Q3: What ingredients are essential for making Taiyaki?
A: To craft Taiyaki, you’ll need a simple batter (flour, baking powder, sugar, eggs, and water or milk), your choice of filling (traditional azuki red bean paste or modern twists like custard or cheese), and of course, a specialized Taiyaki mold to achieve that iconic fish shape.
Q4: How do you prepare the batter?
A: Whisk together flour, baking powder, sugar, eggs, and milk or water until smooth and slightly runny. The batter shoudl flow easily but still hold some structure-think pancake mix but a touch denser.
Q5: What’s the secret to achieving the perfect Taiyaki texture?
A: It’s all about cooking temperature and timing. Preheat your taiyaki mold so the batter starts cooking immediatly upon contact. Pour enough batter to coat the mold, add your filling, then cover with more batter. Close the mold tightly and cook on medium heat, flipping once, until both sides gleam golden and crisp, yet the inside remains soft.
Q6: Can Taiyaki be made with fillings other than red bean paste?
A: Absolutely! While azuki beans are traditional, creative cooks fill Taiyaki with custard, chocolate, sweet potato, cheese, or even savory ingredients like sausage or vegetables, transforming this classic snack into a canvas for flavor adventures.
Q7: Are Taiyaki molds easy to find?
A: Thanks to thier rising popularity worldwide, taiyaki molds are now widely available online or at specialty kitchen stores. They come in electric forms or stovetop versions-choose what suits your cooking style best.
Q8: Any tips for beginners attempting Taiyaki at home?
A: Patience is key. Don’t rush the cooking process-proper heat control ensures the perfect balance of crispy exterior and soft interior. Also, lightly grease your mold to prevent sticking and experiment with fillings to keep the fun fresh.Q9: How is Taiyaki traditionally enjoyed?
A: hot off the mold, Taiyaki is best savored immediately to enjoy the contrast of crisp and creamy textures. It’s a beloved treat during festivals, winter markets, or anytime a taste of Japanese comfort food is called for.
Q10: Why is Taiyaki more than just a snack in Japanese culture?
A: Beyond its deliciousness, Taiyaki represents joy, luck, and communal sharing. Its fish shape is a symbol of prosperity, making it a favorite for celebrations and thoughtful gifting.
Crafting Taiyaki is a fantastic journey of tradition and taste-a delightful way to bring a piece of Japan into your kitchen, one fish-shaped bite at a time!
Wrapping Up
As you wrap up your Taiyaki journey, remember that this beloved Japanese fish-shaped pastry is more than just a treat-it’s a blend of tradition, artistry, and flavor all rolled into one delightful bite. Whether you’re savoring the warm, sweet filling or admiring the golden, crispy exterior, crafting Taiyaki at home transforms a simple recipe into a cultural experience. So, armed with your batter, filling, and a dash of patience, dive into the process and let each Taiyaki you make tell its own delicious story. Happy cooking, and may your kitchen be filled with the comforting aroma of freshly baked joy!