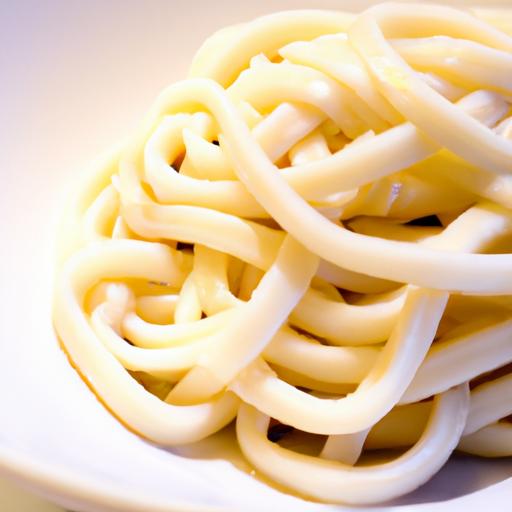

There’s something undeniably comforting about a steaming bowl of udon noodles-those thick,chewy strands that effortlessly soak up savory broth and carry the essence of Japan’s culinary traditions to your palate. But beyond the satisfying slurp lies a rewarding craft: making udon from scratch. While store-bought noodles are convenient, mastering the art of homemade udon unveils textures, flavors, and a sense of accomplishment that no instant pack can match. In this step-by-step guide, we’ll take you on a journey from simple ingredients to perfectly pulled, tender noodles, unlocking the secrets behind this beloved staple and inviting you to bring a taste of authentic japanese artistry to your own kitchen.Get ready to roll up your sleeves and dive deep into the gorgeous craft of udon making.
Mastering Udon begins with understanding the subtle art of selecting the perfect flour and crafting dough that boasts that unmistakable silky smooth texture and satisfying elasticity. This delicate balance is what transforms humble ingredients into tender, chewy noodles that carry broth and sauces with grace.
Prep and Cook Time
Preparation: 30 minutes
Resting/Dough waiting Time: 1 hour
Cooking: 10-12 minutes
Total Time: Approximately 1 hour 45 minutes
Yield
Serves 4 hearty portions
Difficulty Level
Medium – perfect for adventurous home cooks ready to elevate their noodle skills
Ingredients
- 3 cups high-gluten bread flour (for ideal chewiness)
- 1 cup all-purpose flour, sifted (to add softness without compromising strength)
- 1 cup ice-cold water
- 1 teaspoon fine sea salt
- Additional all-purpose flour for dusting
Instructions
- Combine flours and salt: In a large bowl, whisk together the bread flour, sifted all-purpose flour, and salt until evenly mixed.
- Slowly hydrate the flour: Gradually pour the ice-cold water into the flour mixture, stirring with chopsticks or a wooden spoon until coarse clumps form. This cold water technique strengthens the dough’s elasticity by slowing gluten development.
- Knead the dough: Transfer the dough onto a clean surface dusted lightly with flour. Knead firmly for about 10 minutes, folding and pressing the dough until it becomes smooth, supple, and slightly sticky but no longer tearing. If too sticky, dust with a touch more flour sparingly.
- Rest and relax: Shape the dough into a tight ball, wrap it in plastic wrap, and place it under a heavy object (like a cast-iron pan). Let it rest for 1 hour at room temperature to allow gluten to relax and dough to hydrate evenly.
- Rolling out for silkiness: lightly dust a clean surface and your rolling pin with flour. Roll the dough into a large, uniform rectangle about 1/4 inch thick, turning frequently to maintain an even shape and prevent sticking.
- Folding and cutting: Lightly dust the rolled dough with flour again. Fold it into thirds like a letter for easier handling and cut into 1/4-inch wide strips with a sharp knife. Carefully separate strands to prevent sticking.
- Cooking to perfection: Bring a large pot of water to a vigorous boil. Add udon noodles and stir gently to prevent clumping. Cook for 10-12 minutes or until strands yield a perfect tender chew. Drain, rinse briefly under cold water to stop cooking and remove excess starch.
Chef’s Notes
- For extra silky texture, use bread flour with 12-13% protein content to maximize gluten development while balancing with all-purpose flour.
- Ice-cold water is key during mixing to slow gluten formation, contributing to chewy yet tender noodles.
- If dough feels too dry or crumbly during kneading, add water by teaspoon increments. Too wet? Add small amounts of flour carefully.
- Resting under a weighted press prevents dough from puffing, ensuring tighter gluten strands and easier rolling.
- Try adding a splash of kombu dashi broth to water when boiling for subtle umami infusion.
- Make ahead: dough can be refrigerated, wrapped tightly, for up to 24 hours. Let come to room temp before rolling.
Serving Suggestions
Serve your homemade udon in a steaming bowl of savory broth-dashi, soy sauce, and mirin blend beautifully with these chewy noodles. Garnish with freshly sliced green onions, a sprinkle of toasted sesame seeds, and a soft-boiled egg for richness. For a refreshing contrast, add a handful of crisp tempura flakes or a touch of spicy shichimi togarashi. pair with thinly sliced kamaboko or sautéed mushrooms for a nourishing meal that captivates the senses.

Nutritional Details (per serving)
| Calories | Protein | Carbs | Fat |
|---|---|---|---|
| 310 kcal | 9 g | 65 g | 1 g |
Elevate your udon journey by exploring our complete guide to authentic Japanese dashi broth for an elevated flavor foundation. For further reading on flour types, the King Arthur Baking guide is a trusted authority to deepen your understanding.
Q&A
Q&A: mastering Udon – A Step-by-Step Guide to Homemade Noodles
Q1: What makes udon noodles different from other types of noodles?
A1: udon noodles are thick, chewy, and delightfully smooth wheat noodles originating from Japan. Unlike thinner ramen or soba noodles, udon boasts a plump texture that’s both hearty and comforting, making it perfect for soups or stir-fries. Their unique bite comes from a special balance of flour, water, salt, and an exact kneading technique.
Q2: Why should I try making udon noodles at home instead of buying them pre-made?
A2: Homemade udon offers an unparalleled freshness and texture that store-bought versions cannot match. Making udon from scratch lets you control the thickness, chewiness, and flavor. Plus, the meditative, hands-on process connects you with a centuries-old tradition and adds a personal touch to your meal.
Q3: What are the essential ingredients needed for homemade udon noodles?
A3: Keep it simple with these core ingredients: high-protein wheat flour (all-purpose flour works too), water, and salt. Some recipes call for a pinch of baking soda to soften the dough, but the magic really happens in the kneading and resting process.Q4: How do I knead udon dough properly for that perfect chew?
A4: kneading udon dough is a rhythmic dance-start by mixing your ingredients until combined, then knead firmly for about 10 minutes. Use the heel of your palm to push the dough away, fold it back, and repeat. The goal is to develop gluten, which gives the noodles their signature bite. When the dough feels elastic and smooth, you’re on the right track.
Q5: How long should the udon dough rest and why?
A5: Resting for at least 30 minutes (up to an hour) is key.This allows the dough to relax, making it easier to roll out and cut. The rest also improves texture,ensuring your noodles won’t be too tough or crumbly after cooking.
Q6: What’s the best way to cut udon noodles evenly?
A6: Roll your rested dough into a uniform rectangle about ¼ inch thick. Fold it gently without squashing, then use a sharp knife to slice noodles roughly ¼ inch wide. Consistency in width guarantees even cooking and that delightful chew across every strand.
Q7: How can I prevent homemade udon noodles from sticking to each other?
A7: After cutting, toss the noodles lightly with a dusting of flour or corn starch. When cooking, boil them in plenty of water and stir gently to keep strands separated. Once cooked, rinsing them under cold water helps wash away excess starch and maintains that perfect springiness.
Q8: What are some classic ways to enjoy homemade udon noodles?
A8: Udon shines in a hot, comforting broth with scallions, tempura, or a soft-boiled egg. Try it chilled with dipping sauce in warmer months, or stir-fried with vegetables and meat for a rapid, flavorful meal. The chewy texture pairs beautifully with both delicate and bold flavors.
Q9: Any troubleshooting tips if my noodles turn out too hard or too soft?
A9: If your noodles are too hard, you might have under-kneaded or skipped resting-try kneading longer next time or resting the dough adequately. Too soft or mushy noodles frequently enough result from overcooking; watch your boil time closely and test frequently. Adjusting water ratio slightly can also help fine-tune texture.
Q10: Can I experiment with different flours or add flavors to udon dough?
A10: Absolutely! While traditional udon uses wheat flour, mixing in whole wheat or buckwheat can add captivating textures and flavors. Herbs, spices, or even matcha powder can be kneaded in for creative twists-just keep flour-to-water ratios balanced for optimal dough consistency.
Mastering udon at home is a rewarding journey-each bite tells a story of tradition, craftsmanship, and heartfelt cooking. Ready your hands and palate for a noodle adventure that’s both timeless and utterly flavorful!
In Retrospect
As you tie the final knot on your perfect udon dough and watch those thick,tender noodles dance in boiling water,you’re not just crafting a meal-you’re embracing a centuries-old tradition with your own two hands. Mastering udon at home transforms simple ingredients into a comforting, soulful experience that nourishes both body and spirit. Whether served in a steaming bowl of broth or stir-fried with your favorite flavors, these homemade noodles carry the story of patience, technique, and love. So next time hunger strikes, remember: with a little practice and passion, the art of udon is always within your reach-waiting to become your signature dish. Happy noodling!