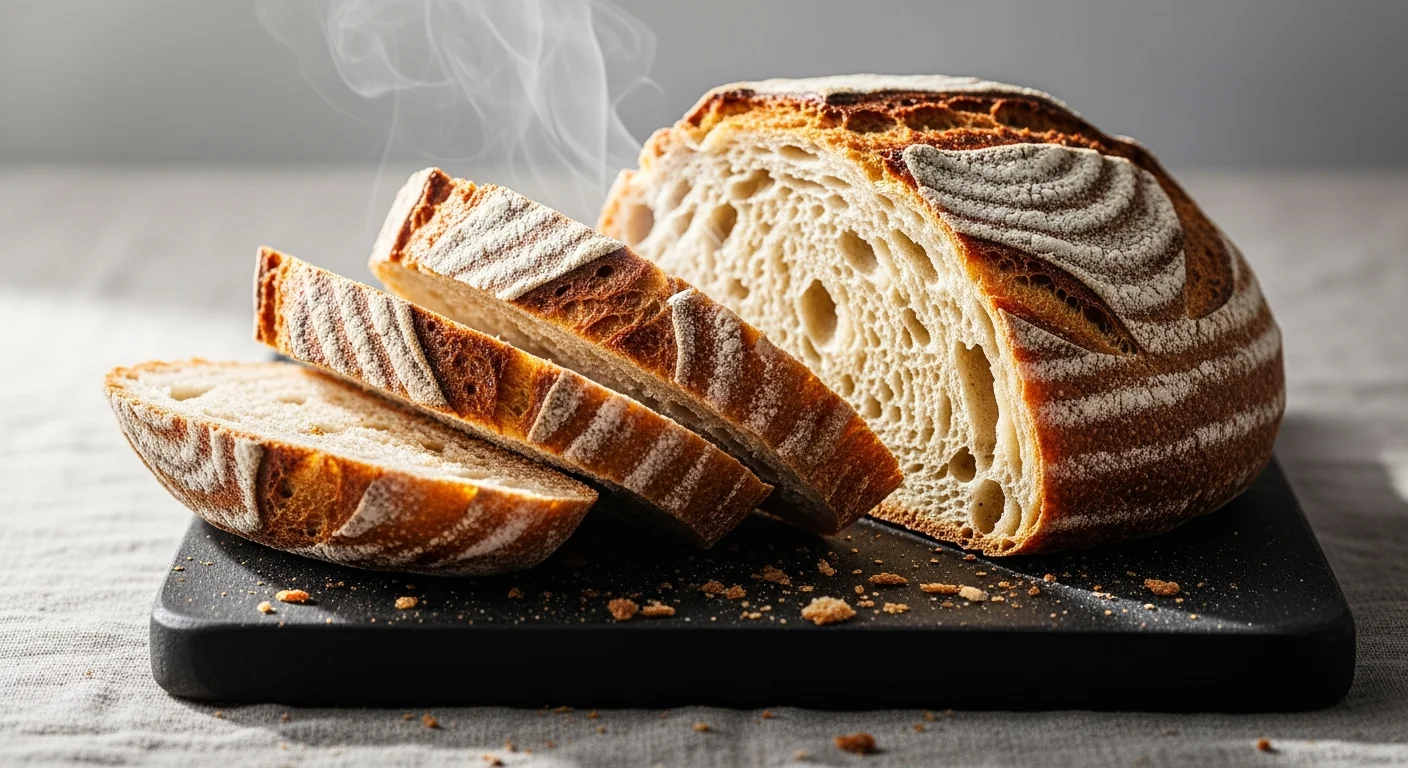
There’s a certain magic in the humble sourdough crust-a golden,crackling armor that tells the story of time,patience,and a living culture nurtured from flour and water. Cultivating that perfect crust isn’t just an art; it’s a science, a ritual passed down through generations and rediscovered by modern bakers craving authenticity. In this article, we’ll dive into essential sourdough starter recipes and share expert tips to help you awaken your wild yeast, feed your bubbling culture, and transform simple ingredients into a crust that’s both deeply flavorful and irresistibly textured. Whether you’re a curious novice or a seasoned pro,join us as we unlock the secrets to cultivating crust that truly sings.
Cultivating crust begins with nurturing the very heart of your sourdough bread: the starter. This living culture is both an art and a science, blending wild yeast and naturally occurring lactobacilli to create a symphony of fermentation that forms a crust unfeasible to replicate with commercial yeast alone. Whether you’re a passionate home baker or an aspiring artisan, mastering your sourdough starter is the first step toward that perfect golden-brown crust with a crackling snap and tender crumb inside.
Prep and Cook Time
- Starter Development: 5-7 days (active daily feeding)
- Fed Starter Ready Time: 4-6 hours (at room temperature after feeding)
- Baking Time (for bread with starter): 35-45 minutes
yield
- Enough starter to bake 2 loaves (approx. 1 ½ cups active starter)
Difficulty Level
- Medium – requires attention and patience but results are deeply rewarding
Ingredients
- 100g unbleached all-purpose flour, sifted for lightness
- 100g whole rye flour, for robust fermentation activity
- 200ml filtered, lukewarm water (about 75°F / 24°C)
- Additional flour and water for daily feedings
Mastering Your Starter: Step-by-Step Guide
- Day 1: In a clean, clear glass jar, mix 100g all-purpose flour and 100g whole rye flour with 200ml lukewarm filtered water. Stir vigorously until the batter is smooth with no dry flour patches. Scrape the sides clean for easy monitoring.
- Cover the jar loosely with a breathable cloth or a lid placed ajar to allow airflow, then leave it at room temperature (around 70°F / 21°C).
- Day 2-3: you may notice bubbles forming or a slight rise-signs the wild yeast is waking up. Discard half the starter (about 150g), then feed it with 50g all-purpose flour and 50g lukewarm water. Stir thoroughly and cover again.
- Day 4-5: By now, your starter should show consistent bubbling and doubling in size within 4-6 hours after feeding. Discard half and feed as before. This timing is crucial for capturing the optimal feeding window to maximize fermentation flavor development.
- Day 6-7: Your starter is mature when it doubles in volume reliably within 4 hours, smells pleasantly tangy (not foul), and bubbles freely. Perform the float test by dropping a teaspoon of starter in water-it should float, indicating plenty of gas trapped inside, perfect for a stunning rise in bread dough.
Essential Tools for Your Starter Success
- Glass or clear plastic jar (at least 1-liter capacity) for easy observation
- Digital kitchen scale (accuracy to 1g)
- Breathable cloths or coffee filters with rubber bands
- Spoon or spatula for mixing (preferably non-reactive material)
- Warm, stable habitat (a kitchen cupboard or proofing box works well)
Tips for Optimal Fermentation and Flavor
- Temperature control is vital: warmer temps speed fermentation but can cause over-acidification; cooler temps slow activity but improve flavor complexity.
- Use filtered water-chlorine will inhibit your wild yeast.
- patience is key: skips in feeding can cause your starter to weaken or develop off odors-if that happens, revive by daily feedings for several days.
- Consider experimenting with different flours (spelt, einkorn) once your starter is mature to tweak fragrance and crumb texture.
Serving Suggestions
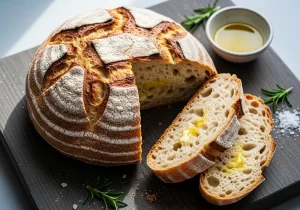
Use your active starter to create breads with crusts that boast a caramelized hue and crackling crispness. For serving, slice fresh from the oven and offer with creamy butter, a drizzle of local honey, or bright, herbed olive oil. Garnish platters with aromatic rosemary sprigs or a dusting of toasted seeds for visual and textural contrast.

| Component | Amount per 100g | Function |
|---|---|---|
| Wild yeast | Varies | fermentation agent that leavens the dough |
| Lactobacilli | Varies | Produces lactic acid for tangy flavor and crust colour |
| Flour | 100g | Provides nutrients and structure |
| Water | 100-200ml | Hydrates the flour and facilitates microbial activity |
Discover more about sourdough bread baking techniques to elevate your baking journey further. Embrace the science behind your starter as you cultivate crusts that tell stories of time, care, and wild nature coming together in your kitchen.
Q&A
Q&A: Cultivating Crust – Essential Sourdough Starter Recipes & Tips
Q1: What exactly is a sourdough starter, and why is it so vital?
A sourdough starter is a lively culture of wild yeast and beneficial bacteria that acts as the natural leavening agent in sourdough bread. Think of it as your bread’s best friend-feeding it regularly keeps it bubbly and active, giving your loaves that signature tangy flavor and airy crumb. Without a starter, sourdough just wouldn’t have its soul.
Q2: Can I create a sourdough starter from scratch at home?
absolutely! All you need is flour, water, a little patience, and a pinch of love.By mixing equal parts of flour and water and allowing it to ferment at room temperature, natural wild yeasts begin to colonize the mixture in about 5-7 days. Stir it daily, feed it fresh flour and water, and watch it come alive with bubbles and a tangy aroma.
Q3: What kinds of flour work best for starting a sourdough culture?
Whole grain flours like rye and whole wheat are superstar starters. they’re packed with nutrients and microorganisms that jumpstart fermentation faster than all-purpose flour alone. You can begin with rye flour and then transition to a blend or your preferred flour as your starter matures.
Q4: How do I know when my starter is ready to bake with?
Spotting a healthy starter is a bit like reading a diary written in bubbles and smells. When it doubles in size, is full of frothy bubbles, and smells pleasantly tangy (like yogurt or mild vinegar), it’s showtime. A simple float test helps too: drop a spoonful in water-if it floats, it’s light and airy enough to raise your dough.
Q5: Any secret tips to keep my starter thriving long-term?
Feed it consistently-every 12 to 24 hours if kept at room temperature, less often if refrigerated. Use filtered or dechlorinated water to avoid stunt growth, and keep your starter in a loosely covered container to let it breathe without drying out. If you ever need a break, refrigeration is your friend.Just remember to revive it with fresh feedings before baking.Q6: Can I customize the flavor or behavior of my starter?
Definitely! The flour you choose, hydration levels (how watery or thick your starter is), feeding schedules, and fermentation temps all influence your starter’s personality. Cooler temperatures tend to develop more acidic, tangy notes, while warmer environments encourage milder flavors and faster rise.
Q7: What should I do if my starter develops a layer of liquid on top (hooch)?
Hooch is a harmless sign your starter is hungry-it’s basically alcohol byproduct from fermentation. Simply pour it off or stir it back in, then feed your starter promptly. If hooch appears frequently, try increasing feeding frequency or adjusting hydration.
Q8: How do I incorporate my starter into a dough recipe?
First,”prime” your starter by feeding it and letting it become bubbly and active. Then measure the amount your recipe calls for, mix with flour, water, and salt, and let the dough undergo a series of rises-frequently enough a slow, cool fermentation followed by a warm proof. The starter not only leavens but flavors the dough deeply.
Q9: What baking techniques help cultivate that perfect sourdough crust?
Steam is the magician behind a glossy, crackly crust. Bake with a covered Dutch oven or introduce steaming water into your oven early in the bake. Scoring the dough lets it expand gracefully, and baking at high temperatures locks in that beautiful golden-brown crust-your hallmark of a crust-loving baker.
Q10: Where can I find starter recipes or troubleshoot common sourdough issues?
Start with trusted sources like artisanal bakers’ blogs, sourdough communities, or classic baking books. Many online forums and social media groups share recipe variations and expert tips. And remember,every starter has a unique fingerprint-embrace the quirks and enjoy the journey to cultivating crust perfection!
To Conclude
As your sourdough journey unfolds,remember that cultivating the perfect crust is as much an art as it is a science. With these essential starter recipes and handy tips in your toolkit, you’re well on your way to baking loaves that boast a crackling, golden crust and a tender, flavorful crumb.embrace the rhythms of fermentation, experiment with hydration levels, and listen to your starter’s unique personality-because each batch tells its own story. So dust off your mixing bowl, nurture those wild yeasts, and let the magic of sourdough transform your kitchen into a haven of rustic, crusty delights. Happy baking!