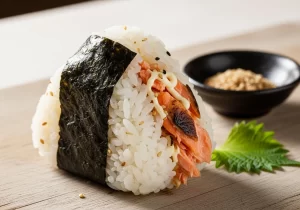
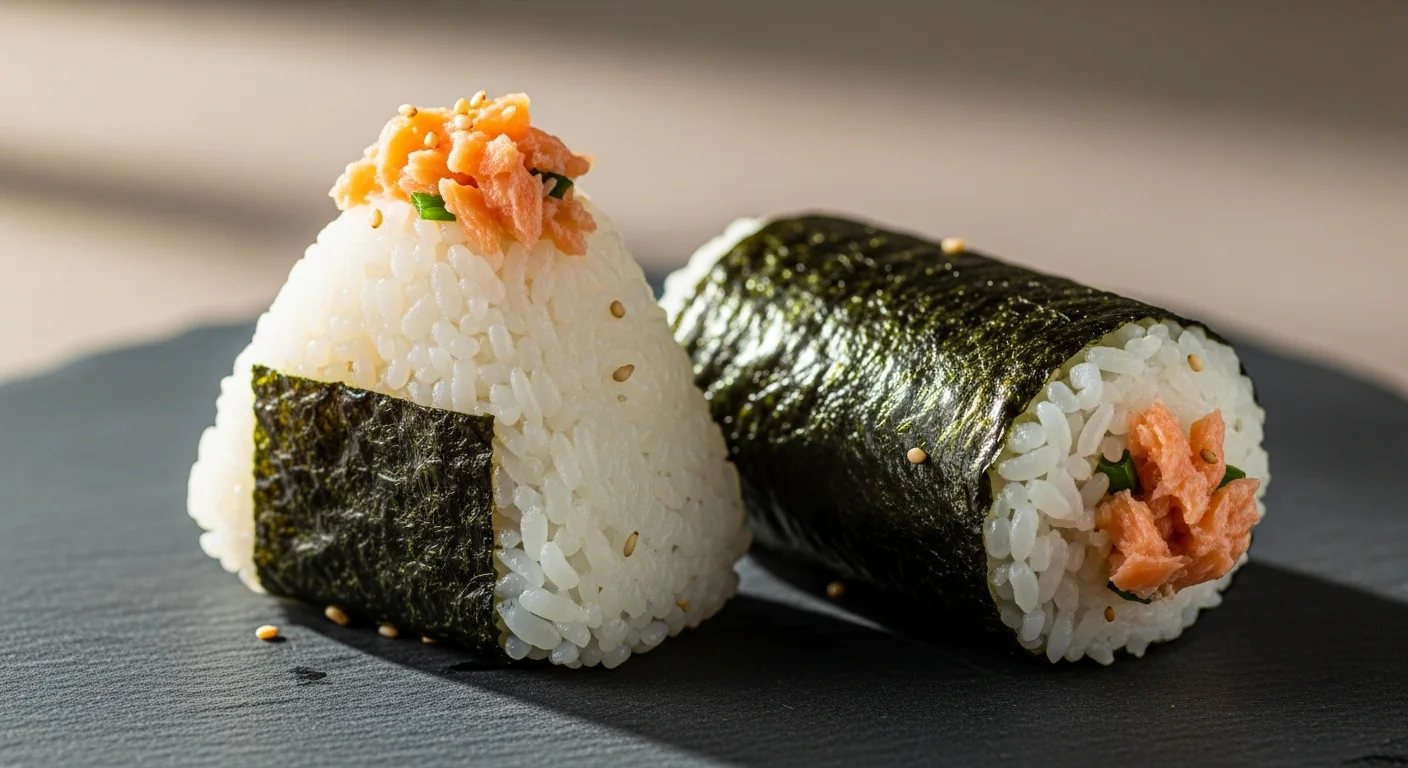
There’s a simple magic in the humble onigiri-a beloved Japanese rice ball that’s as much about tradition as it is about taste.Among its many delightful varieties, the classic salmon onigiri stands out as a perfect harmony of flavors and textures: tender, flaky salmon embraced by silky, slightly seasoned rice, all wrapped in a crisp sheet of nori. Whether you’re a seasoned cook eager to explore new culinary horizons or a curious beginner craving an authentic homemade snack, making salmon onigiri is an accessible and rewarding journey.In this step-by-step guide, we’ll unravel the art of crafting these iconic bites, blending cultural insights with practical tips to help you bring a taste of Japan right to your kitchen. Ready to roll? Let’s dive in.
How to Make Classic Japanese salmon Onigiri starts with selecting the freshest ingredients and mastering the delicate shaping technique that results in the perfect bite-each mouthful bursting with authentic Japanese flavor. This iconic rice ball has warmed hearts and hands for centuries, its simplicity belying the careful craftsmanship behind every step.
Prep and Cook Time
Total Time: 40 minutes (10 minutes prep, 30 minutes cooking)
Yield
Servings: 6 onigiri (rice balls)
Difficulty Level
Medium – perfect for food enthusiasts who want to elevate their home cooking with authentic Japanese technique.
Ingredients
- 2 cups Japanese short-grain rice (sushi rice), rinsed and drained
- 2 ¼ cups water for cooking rice
- 150g fresh salmon fillet, skin on
- 1 tsp salt (for rice and salmon seasoning)
- 2 tbsp sake (optional, for salmon marinade)
- 1 tbsp soy sauce (for salmon seasoning)
- 1 tbsp mirin (optional, for salmon glaze)
- 1 tbsp sesame seeds (to mix with rice or garnish)
- 2 sheets nori (seaweed), cut into 2-inch wide strips
- 1 tsp furikake seasoning (optional, for extra flavor in rice)
Instructions
- Prepare the salmon: Lightly season the salmon fillet with salt and let it rest for 10 minutes, then pat dry. Add a splash of sake if using, and bake or pan-sear over medium heat until cooked through (about 8 minutes, skin side down first). Once cooled, flake the salmon into bite-sized pieces, discarding the skin.
- Cook the rice: Rinse the Japanese short-grain rice under cold water until the water runs clear, then drain thoroughly. Combine rice and 2 ¼ cups water in a rice cooker or saucepan. Cook according to your device’s instructions or simmer covered on low until water is absorbed (about 15 minutes).
- Season the rice: Once cooked, gently fluff the rice and fold in 1 teaspoon of salt. If desired, mix in furikake seasoning or sesame seeds for subtle depth and texture.
- Shape the onigiri: Wet your hands lightly with water and rub a pinch of salt between them to prevent sticking and add seasoning. Take about half a cup of warm rice and place it into your palm.Create an indentation in the centre and spoon in a 1-2 teaspoon portion of flaked salmon. Mold the rice around the filling,shaping into a tight triangle or oval-firm but not compressed-to ensure a satisfying bite.
- Wrap with nori: Place a strip of nori around the base or side of each rice ball.The seaweed serves as a handle and adds savory contrast while helping keep the onigiri intact.
- Store properly: Wrap each onigiri in plastic wrap for freshness, keeping them in the refrigerator if not consumed within the hour. For best texture, eat within 24 hours, allowing the flavors to develop beautifully.
Tips for Success
- Use genuine Japanese short-grain rice for the sticky texture essential to perfect onigiri.
- If onigiri feels dry, lightly brush the rice surface with water before shaping.
- Replace salmon with other fillings like pickled plum (umeboshi) or tuna mayo for variation.
- To avoid soggy rice balls, wrap nori just before eating rather than long-term storage.
- Make a batch ahead and freeze wrapped onigiri; thaw naturally for a quick meal on the go.
Serving Suggestions
Present onigiri on a simple wooden platter or traditional bamboo leaf for a charming touch. Garnish with toasted sesame seeds and a small side of pickled ginger or lightly steamed edamame.Pair with a warm cup of green tea or miso soup to complete the authentic Japanese experience.

| Nutrient | Per serving (1 onigiri) |
|---|---|
| Calories | 210 kcal |
| Protein | 12 g |
| Carbohydrates | 30 g |
| Fat | 5 g |
For more classic Japanese recipes using seasonal ingredients, check out our Japanese Home Cooking Guide. For detailed guidance on authentic sushi rice prep, visit JapaneseCooking101’s Sushi Rice Tutorial.
Q&A
Q&A: How to Make Classic Japanese Salmon onigiri: A Step-by-Step Guide
Q1: What exactly is onigiri?
A1: Onigiri,often called Japanese rice balls,are handheld snacks made from sticky rice formed into shapes-usually triangles or ovals-and often filled or topped with savory ingredients. Think of them as Japan’s answer to the sandwich: portable, comforting, and endlessly customizable.
Q2: Why salmon for Onigiri?
A2: Salmon offers a rich, slightly oily flavor that pairs beautifully with the mild, slightly sweet Japanese rice. It’s a classic filling that carries a satisfying umami punch, making your Onigiri both hearty and delicious.Q3: What type of rice should I use?
A3: Short-grain Japanese rice is key. Its sticky texture allows the Onigiri to hold their shape without crumbling, creating that perfect chewy bite. Rinse it well before cooking to remove excess starch for the ideal texture.
Q4: How do I prepare the salmon?
A4: The salmon is typically grilled or pan-seared until cooked through and flaky. You can season it simply with a pinch of salt or brush it lightly with soy sauce for extra depth. Once cooked, flake it into bite-sized pieces.
Q5: Do I need any special tools?
A5: Not necessarily! While rice molds exist and can make shaping easier, Onigiri can be molded by hand. Just wet your hands with salted water to prevent sticking and gently press the rice around the salmon filling into a triangular or oval shape.
Q6: What about seasoning the rice?
A6: Traditional Onigiri rice is seasoned lightly with a bit of salt. Sometimes, a touch of rice vinegar is added, but classic salmon Onigiri usually keeps the rice simple so the salmon can shine.
Q7: should I wrap the Onigiri in seaweed?
A7: Yes! A strip or sheet of nori (seaweed) not only adds flavor and texture but also makes the Onigiri less sticky to hold. It’s the classic finishing touch.
Q8: Can I add anything else inside or on top?
A8: Absolutely. Some peopel mix a little mayo with the salmon or add a hint of wasabi for a kick. Sesame seeds or pickled plum (umeboshi) on the inside or sprinkled on top are other popular variations.
Q9: How do I store Onigiri?
A9: Fresh is best, eaten the same day for optimum texture and flavor.If needed, wrap them tightly and refrigerate, then bring to room temperature before eating to slightly soften the rice.
Q10: Any final tips for perfect Onigiri?
A10: Keep your hands moist and lightly salted to manage sticky rice and season subtly to let the salmon’s flavor be the star. Practice makes perfect-soon you’ll be crafting these Japanese classics with ease and savoring every bite!
Closing Remarks
Mastering the art of crafting classic Japanese salmon onigiri is more than just following a recipe-it’s an invitation to connect with a cherished tradition that blends simplicity,flavor,and care. With every perfectly shaped triangle and each tender bite of seasoned salmon, you’re not only savoring a delightful snack but also embracing a cultural experience that has nourished generations. So next time you crave a portable, wholesome treat, remember that your kitchen holds the key to this timeless classic-ready to be made, shared, and enjoyed. Happy rolling!