
There’s something undeniably magical about a bubbling jar of sourdough starter-an ancient alchemy of flour and water transformed by wild yeast into the living heart of tangy, crusty bread. yet, mastering this delicate ecosystem can feel like unlocking a well-guarded secret passed down through generations of bakers. In this article, we’ll demystify the art of sourdough starters, sharing top recipes that cater to every kitchen and expert tips that turn novice curiosity into confident craftsmanship. Whether you’re nurturing your first culture or seeking to elevate your loaf to bakery-worthy brilliance,get ready to embrace the science,the patience,and the soulful rewards baked into every rise.
Mastering sourdough starters unlocks a engaging world where science and artistry blend to create the foundation of irresistibly tangy, textured bread. Understanding the living ecosystem of wild yeast and bacteria within your starter transforms this humble mixture of flour and water into a lively culture that powers fermentation and flavors your loaves with complex depth.
Prep and Cook Time
Preparation: 5 minutes daily for 5-7 days
Active Cooking Time: None (just patience!)
Yield
Approximately 1 cup of active sourdough starter sufficient for multiple baking sessions.
Difficulty Level
Easy to Medium – perfect for beginner to intermediate bakers ready to embrace natural fermentation.
Ingredients
- 1/2 cup whole rye flour (organic if possible, for rich microbial activity)
- 1/2 cup unbleached all-purpose flour (for balanced fermentation)
- 1/2 cup filtered, room temperature water (chlorine-free to protect wild yeast)
Step by Step guide to Creating Your Perfect Starter from Scratch
- Mix the flours and water thoroughly in a clear glass or BPA-free plastic container until a thick batter forms. Scrape down the sides for uniform hydration.
- Cover loosely with a breathable cloth or lid to allow airflow but protect from contaminants. Store at a steady 70-75°F (21-24°C).
- Feed your starter daily by discarding half of the mixture, then stirring in equal parts (by weight) of fresh all-purpose flour and filtered water. This replenishes nutrients and invigorates fermentation.
- Between days 3-5, watch for bubbles and a tangy aroma-a sign your starter is beginning to teem with healthy wild yeast and lactic acid bacteria.
- By day 6 or 7,the starter should double in volume 4-6 hours after feeding and display a pleasant,slightly alcoholic scent indicating peak fermentation.
- Perform the float test to check activity: drop a spoonful of starter into water. If it floats, it’s ready to use for baking!
Troubleshooting Common Issues and Maximizing Starter Longevity
If your starter smells overly sour or develops discoloration, it’s usually a sign of low feeding frequency or temperature fluctuations. Adjust the environment by placing it in a warmer spot or feeding it twice daily for a stronger culture. Should mold appear, discard and restart-to avoid contamination.
To maximize longevity, maintain regular feedings. When storing long-term, refrigerate the starter and feed it weekly to preserve its vitality. Reactivate with daily feedings before baking.
Choosing the right Flours and Ingredients for Peak Fermentation
Whole grain flours like rye and whole wheat harbor beneficial microbes and minerals that jumpstart fermentation, injecting your starter with life. Complement these with unbleached all-purpose flour for balance and consistency. Always use filtered water to avoid chlorine, wich hampers microbial growth.
Chef’s Notes and Tips for Success
- Variations: Experiment with spelt or einkorn flours to develop unique flavor profiles.
- Substitutions: If rye isn’t available, try whole wheat or a mix of ancient grains; avoid bleached flours.
- Room temperature matters: Cold environments slow fermentation-consider placing your jar near a warm appliance or inside an oven with the light on.
- Stir daily: Incorporate air to encourage yeast activity.
- Use a kitchen scale: Precise feedings ensure consistent activity and a predictable starter rhythm.
Serving Suggestions
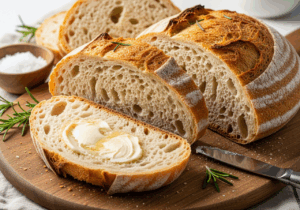
Once your starter is bubbling with life, use it to craft dense, crusty artisan breads with a crisp exterior and tender crumb. It also enriches pancakes,pizza dough,waffles,and even crackers. For a stunning presentation, garnish sourdough bread with a dusting of flour, scoring patterns, or a sprinkle of seeds like sesame or poppy to highlight its rustic charm.

| Nutrient | Per 100g Starter |
|---|---|
| Calories | 98 kcal |
| Protein | 3.2 g |
| Carbohydrates | 20 g |
| Fat | 0.5 g |
discover more artisan bread techniques in our Artisan Bread Recipes collection. For an in-depth scientific dive, visit ScienceDirect’s Sourdough Overview.
Q&A
Q&A: Mastering Sourdough Starters – Top Recipes and Expert Tips
Q1: What exactly is a sourdough starter, and why is it so vital?
A sourdough starter is a living, bubbling mixture of flour and water teeming with wild yeast and amiable bacteria. This natural culture is the heart and soul of sourdough bread, responsible for its charming tang, airy crumb, and that irresistible crust. Think of it as your very own baking companion that breathes life into dough without commercial yeast.
Q2: How do I create a sourdough starter from scratch?
Starting your sourdough journey is like welcoming a new pet-you need patience and care. Combine equal parts of whole grain flour (like rye or whole wheat) and filtered water in a jar. Stir,cover loosely,and let nature do its work at room temperature. Feed it daily with fresh flour and water, watching for bubbles and a pleasant sour aroma.In about 5 to 7 days, your bubbly starter will be ready to use!
Q3: Are there any foolproof recipes for the ideal sourdough starter?
absolutely! One classic recipe involves mixing 50 grams whole rye flour with 50 grams unchlorinated water, feeding daily with the same amount of white flour and water after the initial 48 hours.Rye flour jump-starts fermentation thanks to its rich nutrients. Another expert-approved tip is to switch to all-purpose flour once the starter is active for a smoother flavor and stronger rise.
Q4: How do I maintain and feed my sourdough starter like a pro?
Consistency is key! feed your starter once or twice daily with equal parts flour and water, discarding a portion before each feeding to keep it manageable. Use lukewarm water to awaken the microbes and keep the starter at room temperature if baking frequently. If you bake less often, refrigerate it and feed weekly-just remember to revive it with a few warm feedings before baking.
Q5: what are some common problems and how do I fix them?
If your starter smells like nail polish remover, it’s probably too acidic-feed it more frequently and discard less. A sluggish or flat starter may need warmer temps or a flour boost. If mold or fuzz appears, it’s best to start anew, as that indicates contamination. Remember, a healthy starter should smell pleasantly sour and look bubbly!
Q6: Can I experiment with different flours or techniques?
Definitely! Using rye, spelt, or even einkorn flour can add unique flavors and textures. Some bakers incorporate fruit juice or pineapple juice during the initial days for acidity balance. Feel free to adjust hydration levels for thicker or thinner starters based on your baking style. The beauty of sourdough is in its endless variation-your starter can be as idiosyncratic as you are.
Q7: How do I know when my starter is ready to bake with?
Your starter is ripe when it doubles in size within 4 to 6 hours of feeding, is bubbly throughout, and passes the “float test”-a spoonful gently dropped in water floats like a tiny loaf! This means the yeast activity is strong enough to leaven your bread.Q8: Any final expert tips for mastering sourdough starters?
Patience and observation are your best friends. Keep a sourdough journal tracking feedings, ambient temperature, and flour types to learn your starter’s personality. Embrace the occasional quirks-they’re part of the artisanal charm. Most importantly, enjoy the process; nurturing your starter is a rewarding ritual that connects you with centuries of baking tradition.
With these insights and recipes, your sourdough starter won’t just be a mixture-it’ll be a living masterpiece ready to transform flour and water into magic!
The Way Forward
As you embark on your sourdough journey, remember that mastering a starter is both an art and a science-a living testament to patience, creativity, and care. With the recipes and expert tips shared here, you’re well-equipped to nurture your starter from a humble mixture of flour and water into a thriving culture bursting with flavor and character. Embrace the rhythms of feeding and fermenting, celebrate each bubbly rise and tangy aroma, and let your sourdough starter become not just an ingredient, but a cherished companion in your baking adventures. Happy baking-and may your loaves always rise with confidence!